


Contact Board Module
The contact board module provides a visual reference for managing EMDAR contacts. It is linked to other EMDAR modules via intergrid, which allows targets identified on waterfall displays to be directly created as contacts.
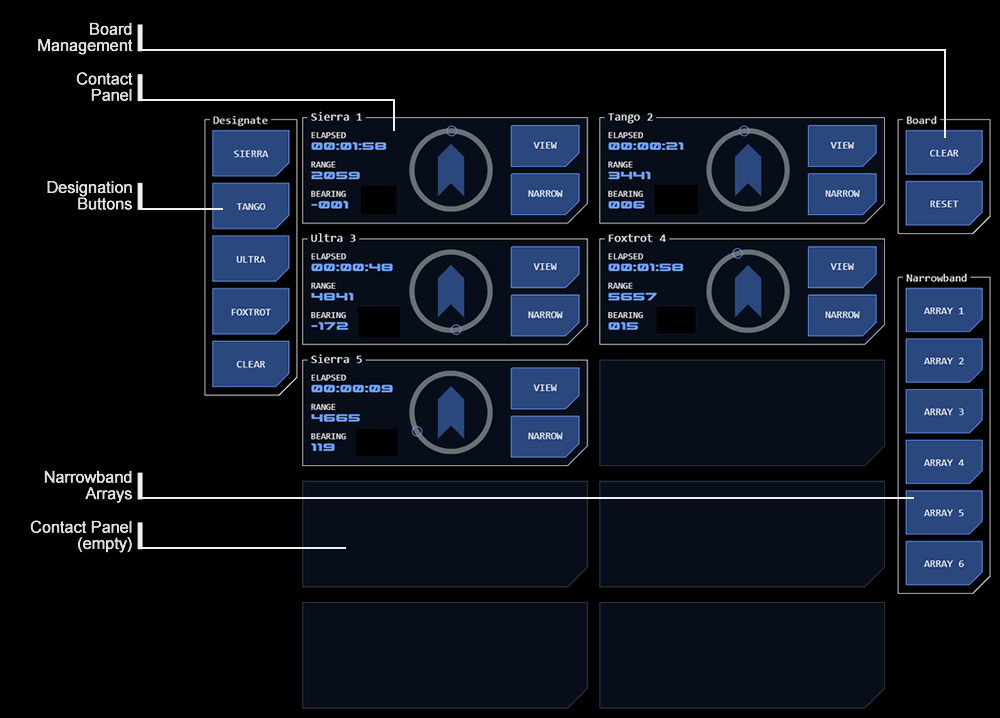
Module Overview
The module includes up to ten contact panels and buttons for managing contact designation and assignment of narrowband arrays.
The module is used in conjunction with the navigation radial module (in mode 0) which displays either target information from the EMDAR waterfall modules (on a different console panel) or the currently selected contact’s range and bearing.
Module Modes
The module has three modes:
Main Mode (mode 0) allows the creation and updating of contacts.
Read-Only Mode (mode 1) displays all contacts but does not allow contacts to be added or updated.
Target Mode (mode 2) displays only tracked contacts and allows one of the contacts to be selected as a target, passing its data to another module (such as a firing solutions calculator).
Main Mode
In this mode the module can be used to create and updatre contacts and assign contacts to narrowband arrays.
Creating Contacts
Initially a contact must be defined and assigned to one of the contact panels on the board.
Contact definition starts at the EMDAR waterfall modules where a target is selected by selecting ranges on one lateral and one longitudinal array. The point in space represented by the intersection of those ranges is translated into a bearing and range on the navigation radial (on the same panel as the contact board).
If the operator wished to convert this to a contact, they select a designation and an empty contact panel. The contact is created.
Updating Contacts
If the contact’s location needs to be updated, the contact is selected for viewing. The contact’s current range and bearing will be displayed on the navigation radial. If a new target location is required, this can be entered on the waterfall displays, which will update the navigation radial.
If a designation change is required, the new designation can be selected (if necessary without changing the location data).
The contact can then be updated with the new data.
Assigning Narrowband Arrays
If the operator believes a contact is accurate enough for narrowband tracking then they can assign it to a narrowband array. If the track acquisition is successful, the contact changes status.
Functions
Contact Panels
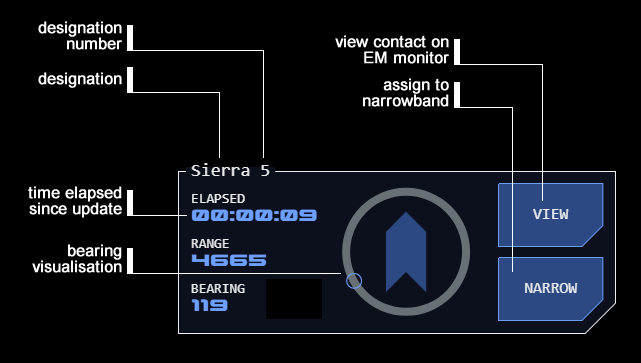
Each contact has a panel, which includes data on the designation and location of the contact. This is presented numerically and as a visualisation (a smaller version of the navigation radial).
 Designation
Every contact is given a designation, which includes a codeword representing the contact’s expected posture (eg unknown, neutral, friendly, threat) and a unique number.
The designation is assigned when the contact is created and can be changed at any time. The number is generated sequentially and cannot be changed.
Elapsed Time
The time counter displays elapsed time since the contact was created or updated. This is to prompt the operator to check and update the contact’s current position (as any contact movement cannot be tracked without a narrowband array).
The counter will shift to alert and then alarm states after configured times have elapsed (see below).
Range and Bearing
The contact represents a point in space estimated to be the location of a TSMO. Range and bearing to this point in space is constantly updated as the tracking vessel moves.
The contact cannot automatically change the point in space if the contact moves, as the system is not tracking the vessel at this point, only maintaining range and bearing to a fixed point in space. Automatic tracking of a contact only occurs when a narrowband array acquires a track.
View Button
This button is used to display the contact’s current details on the navigation radial (which will toggle to secondary source mode). The button will toggle to UPDATE when pushed. A new target can then be selected on the waterfall displays which will update the navigation radial with a new range and bearing (and toggle the radial back to primary source mode).
When the UPDATE button is pushed, the new range and bearing will be applied to the contact (and the button will toggle back to VIEW).
Deleting a Contact
To delete a contact, push the VIEW button (which will toggle to UPDATE). The bottom designation button (See below) is CLEAR. Push this and then push the UPDATE button. The contact will be deleted.
The designation number of that contact will not be reused.
Designation Buttons
To create a contact the operator must specify a target and supply a designation by selecting one of four designation buttons representing the contact’s expected posture.
The designation can be updated at any time by pushing the VIEW button (which will then toggle to UPDATE) to display the contact’s current details, with the button corresponding to the current designation highlighted. A new designation may be selected which is then applied by pushing the UPDATE button (which will then toggle back to VIEW).
Narrowband Arrays
Narrowband arrays are highly directional and focussed EMDAR sensor arrays which are capable of automatically tracking a target. In order to acquire a target, the arrays must be directed to a point in space very close to the actual location of the target TSMO.
 Because of the computational resources required for tracking there are a maximum of six narrowband arrays available.
Assigning a Narrowband Array
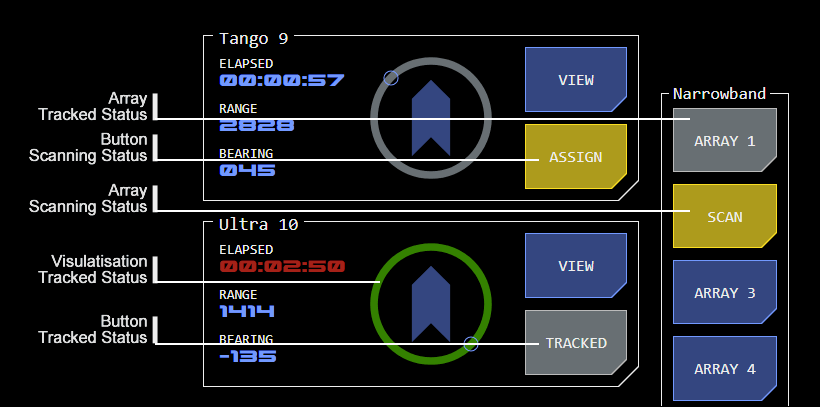
When the operator believes a contact represents the actual location of a target TSMO, they can assign the contact to a narrowband array by pushing the contact’s NARROW button (which will toggle to ASSIGN) and then pushing one of the available narrowband array buttons (which will toggle to SCAN).
If the track is successful and the target TSMO is acquired by the narrowband array, the narrowband button will toggle to active state. On the contact panel, the position visualisation will display with a different colour and the NARROW button will toggle to TRACKED.
Speed Display
A tracked contact will display the contact's speed instead of the elapsed timer.
Checking Assignments
In order to check which contact an array is tracking, push the (active) array button. The frame around the tracked contact will change to the tracking colour temporarily.
Releasing a Narrowband Array
If a contact no longer needs to be tracked or if a narrowband array is needed by a higher priority target, an existing track can be terminated by pushing the TRACKED button on the corresponding contact panel. This will release the narrowband array (its button will toggle to inactive state).
Board Management
To clear the board of all contacts there are two options.
The CLEAR button will remove all contacts from the board but will not reset the designation number sequencing. If for example the highest designation number on the board was seven before it was cleared, the next contact to be created after clearing the board would be eight.
The RESET button removes all contacts from the board and resets the designation number sequence to one. This option should only be used after a tactical engagement has been completed to avoid confusion.
Target Mode
In this mode the module displays only tracked contacts.
Target mode is read-only - contacts cannot be added or updated.
Functions
Closing Velocity (CV) Display
In this mode, the difference in speed between the vessel and the contact (closing velocity) is displayed instead of speed.
Target Selection
A single target button is provided for each contact. Other compatible modules are notified of the currently selected contact.
The button operates in radio-button mode (selecting a button automatical;ly de-selects any currently active button).
Concept Site
Immersive sci-fi and how to join the adventure
Crew Site
Information and tools for ISDC crew members


